Saturday 24 December 2016

Spring Flowers Cards

I came across this post by Yana Smakula for Simon Says Stamp Blog where she used a single stamp set to create 4 different cards. This inspired me to try something similar. And for this I chose the Botanicals 3 Stamp set from Paper Smooches and created 3 CAS cards.


For all the 3 cards I used the same stamps and the same distress colors as well. The colors I used - Mustard Seed, Worn Lipstick, Ripe Persimmon and Peeled Paint and Broken China for one of the cards.

Card 1 - All Over Background with some Sparkle


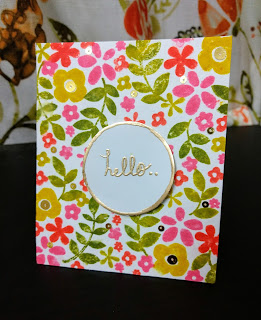
For this card, I stamped the flowers and the leaves from the Botanicals 3 set all over the front panel randomly in the colors mentioned above using Distress Inks. I left some space in the center for sentiment that I was going to place on top. I also sprinkled very little water on top of the flowers for some effect.


I decided to 'Make it Sparkle' inspired by the SSS Wednesday Challenge :) So for the sentiment I cut out a circle and went with a Handwritten 'hello' sentiment which I then heat embossed in Gold. Also heat embossed the edges of the circle with Gold. After that I adhered some gold sequins to add some more sparkle to finish off the card.


I am entering this card in the following challenges


Card 2 - Circular Patterns


For this card I used only the smaller flowers from the set and stamped them in random circles. I introduced a bit of Blue in this card as well. For the sentiment I made a small Banner and painted it with Broken China Distress Ink and stamped the sentiment from Paper Smooches Birthday Bash stamp set. I also added a few dots with a gold marker on the banner and the card - again for a bit of sparkle.

Entering this card for the following challenges


Card 3 - Corner Patterns


For this card I stamped the flowers and leaves only in the 4 corners. For the sentiment, I cut a rectangular piece and I stamped small dots in the colors of the flowers all over and then stamped the Best Wishes sentiment from Mudra Stamps. I also drew a black border around the rectangular piece and then adhered it in the center of the front panel.


Entering this card in the following challenges


Supplies for all 3 Card
  • Canson Watercolor paper
  • Distress Inks
  • Botanicals 3 - Paper Smooches
  • Birthday Bash - Paper Smooches
  • Best Wishes - Mudra Stamps
  • Foam Tape
  • Sakura Micron Pen
  • Deco Art Gold Marker
  • Gold Sequins

Wednesday 21 December 2016

Watercolor Resist Cards

Sharing a couple of cards I made using the watercolor resist technique - something I have been wanting to try for sometime now.


The technique involves creating a kind of a surface using anything that basically resists color. For my cards I used heat embossing as the technique to resist the watercolors.

I made two contrasting CAS cards - one for a birthday party related theme and the other a bit more on the elegant side to say a simple 'Thanks'.

Card 1 - Celebration Card


For this card I used the Birthday Bash stamp set from Paper Smooches. I heat embossed the balloons and the sentiment on Watercolor paper from Canson - the balloons in white and the sentiment in silver. These elements would work as the resist for my technique. I also stamped a cake from the same stamp set using Ranger Jet Black Archival Ink.

I used Zig Clean Color Real Pens to be my watercolor medium. First I applied water with a brush all across the paper. I applied some Blue Zig on to a clear acrylic block and used a brush to apply the color on the entire panel. The embossed parts resisted the color. I also avoided coloring inside the cake. Once I got some color for the background I proceeded to color inside the balloons in a similar manner blending a few colors from the acrylic block. I then colored the cake. I felt the background needed more color so I added more color around the balloons till I got the desired look.
The colors used are Cobalt Blue, Blue and Carmine Red.


I felt the balloons looked bare without the strings. I wanted a bit more of silver on my card as well so I used the Clear Emboss It pen from Ranger to draw strings and then heat embossed them in silver. I finished the card by adding some white dots on the balloons and the cake using white Sakura Gelly Roll pen.


I am entering this card in the following challenges.


Card 2 - Thank You card


I made this card the exact same way as the previous one. What is different are the stamps and the colors used. The flowers are from the Flower Garden stamp set by Tim Holtz from Stampers Anonymous. The Zig colors used are Pink, Carmine Red, Orange and Yellow.


I adhered the finished panel on to a card base and added a handwritten Thank You sentiment. I splattered drops of pink color around the sentiment to finish off the card.


I am entering this in the following challenges


Supplies for both Cards
  • Birthday Bash stamp set by Paper Smooches - Card 1
  • Tim Holtz Flower Garden by Stampers Anonymous - Card 2
  • Canson Watercolor Paper
  • Zig Clean Color Real Brush Pens
  • Versamark Watermark pad
  • Ranger White and Silver Embossing Powder
  • Ranger Heat It Tool
  • Sakura Gelly Roll Pen - white
  • Sakura Micron Pen - black
  • Ranger Jet Black Archival Ink pad
  • Ranger Clear Emboss It pen

Thursday 15 December 2016

CAS Wedding Card

I love the White and Gold combination and I think they are an ideal choice for a wedding. So I decided to use these colors to make Wedding Gift card.


Other than white and gold I also used some blended colors of Blue, Green and Yellow - to create some subtle shades - so that they don't take much away from the White and Gold look.

To start off, I drew a rough circle in the center of the front panel of the card base. I took one of the leaf sets from Mudra Stamps' Leafy stamp set and applied three shades (Mustard Seed, Peeled Paint and Broken China) of distress inks randomly on the stamp and then stamped it inside the circle. This created some very beautiful blended colors and each leaf pattern was of a unique shade. After the circle was covered, I cut out a circle in the center of another piece of card stock and placed it on top of the card base.

Once this was done I went ahead and added touches of Gold to the card. I drew a golden circle around the cut out circle with Deco Art Gold marker. Then with a single leaf stamp from Altenew's Peony Bouquet stamp set I heat embossed in gold the leaves randomly around the circle.


I used a pale yellow card stock for the sentiment. Sentiment is from Mudra Stamps again. I heat embossed the sentiment in Gold and stuck it across the center of the circle. I stamped the leaf set on the ends of the sentiment strip as well to finish the card.


I intend to use this card for the next wedding I go to! :)

Supplies

  • Mudra Stamps - Leafy
  • Mudra Stamps - Sentiment Essentials
  • Distress Inks
  • Deco Art Gold Marker
  • Versamark Watermark ink pad
  • Ranger Gold Embossing Powder
  • Altenew Peony Bouquet stamp set
  • White and Pale Yellow card stock


I am entering this card in the Mudra Sketch for Challenge #4. The idea of the layout of the card was inspired from this sketch.


Monday 12 December 2016

Snowy Christmas Card


Here I am with another Christmas Card. This time I wanted to make a CAS (Clean and Simple) card with a night sky background along with some speckles of snow.


Stamping

Before getting to the background I decided to finish the stamping and heat embossing elements. So I started by roughly drawing a circle in the center. I used the snowflakes and baubles from Mudra Stamp's Christmas Decor set and arranged them along the circle. I heat embossed the snowflakes with White embossing powder and the baubles with Silver to give them a shiny ornament look.
For the sentiment, I thought I would try something on my own for a personal touch and used the Emboss IT pens from Ranger and wrote my sentiment Merry Christmas in the center of the circle. I embossed this also with some Silver embossing powder.


With this my stamping part was done and I was ready to move on to the background.

Background

For the background I wanted an inky night sky so I took a few shades of blue in my Distress ink stock  and Black Soot and blended the colors from light to dark to create the look. After I got the desired look I splattered some white acrylic paint spots to give a snowy night look. Also drew a few stars with the White Sakura Gelly Roll pen.


I wanted a reindeer jumping over my sentiment and I chose to stamp it with Festive Berries Distress ink as I liked the Red-Blue contrast that I could get. The reindeer is also from the same Mudra Stamp set. I fussy cut the reindeer and mounted it above the sentiment with some foam squares. I wanted to create an effect where the reindeer had pounced over the Merry Christmas sentiment which caused the sentiment to slant.


Supplies

  • Mudra Stamps - Christmas Decors
  • Ranger White and Silver Embossing Powder
  • Ranger Heat - It tool
  • Ranger Emboss IT pens
  • Distress Inks and Mini blending tool
  • Sakura Gelly Roll Pen - White pen
  • White Cardstock from Papericious


.Challenges - I am entering this card in the following challenges!

Saturday 10 December 2016

Blooming Peonies Card

Today I am sharing another card I made for the Altenew Challenge using the Altenew Peony Bouquet stamp set.


Similar to the previous card I made (Eternal Love), I stamped a few flowers and leaves from the Peony Bouquet set in an arrangement I liked onto some watercolor paper. I used the Versamark Watermark Stamp pad and then heat embossed it with Ranger Gold embossing powder. I used the Zig Clean Color Real Brush Pens to color the stamped images. I also used a waterbrush to blend the colors to give that watercolored look. I did a light blue wash for the background again using the Zig,


I took the sentiment from the Altenew Blooming Dahlias stamp set and heat embossed it with gold embossing powder as well. At this point I was wondering what next. Then I saw the small berries like set in the Peony stamp set and decided to stamp it on the upper area which was empty multiple times - again in gold and colored it in with some Pink and Green Zig.

I trimmed the panel a bit and adhered it onto an ivory card base. To have a bit more of the green I drew a stitched pattern around the watercolor panel with the Green Zig.


I liked how it had turned out and I left it at that. The card was done :)


Supplies

  • Altenew Peony Bouquet and Blooming Dahlias stamp set
  • Zig Clean Color Real Brush Pens
  • Brustro Watercolor paper
  • Mini MISTI tool
  • Versamark Watermark pad
  • Ranger Gold Embossing Powder
  • Ivory Cardstock


This card is based on the March 2016 challenge. Inspired by the colors.


Friday 9 December 2016

DIY Home Decor - Wine Bottle

Today I'm sharing a couple of home decor items using wine bottles that I had made sometime back. Its fairly simple to make with minimum number of items.


These are a lot of fun to make and you also get the satisfaction of having created something on your own. :)


Bottle 1 - Sequins

Supplies
  • Wine bottle (or any glass bottle of your choice)
  • Sequins - of your color of choice
  • Craft Glue

The one thing you will need the most for this particular design is Patience! :D But I can assure you that it will be a rewarding experience. 

You basically can start at the bottom of the bottle and work your way upwards. Apply some glue to the back of the sequin and then adhere it to the bottle. Continue with the others and try to apply them in a straight line around the bottle to give it a nice look of uniformity. Then you just continue to build it line by line as you move up.

For the bottle I made, I also used some bigger sized sequins for some change in design. You can also do the same with different sizes and colors of sequins to create some nice patterns.

After I was done with the sequins part I painted the cap of the bottle (it came with one) with gold paint and it was done.


Bottle 2 -  Spray Paint

Supplies
  • Bottle
  • Spray Paint - (I used Rust-oleum's Bright Gold Spray paint)
  • Glitter Powder
  • Craft Glue

This design is less time consuming but you need to be careful with the technique to get a neat finish.

The first step is to prep the bottle. You need to make sure the stickers if any are gone and have not left a sticky mess. Clean the outside of the bottle thoroughly. For the spray paint to adhere well and to get a uniform look the bottle needs to be absolutely clean from the outside. 

Once the bottle is ready you can start with the spraying. Make sure you are in an airy place like a balcony or terrace - basically not inside your house. Set up the bottle in a comfortable setting and then start spraying. Spray in a uniform motion from one side to the other. Keep turning the bottle to get an even coat all around.

Once you are satisfied with the sprayed look you can either leave it at that or you can add some sparkle to it like I did with some Glitter powder. For this you need to apply some glue on the sprayed bottle (after the paint has dried). After that, sprinkle the glitter powder all over the bottle. The glitter will stick only on the areas where you have applied glue. After you brush off the excess glitter your bottle is ready!


Hope you liked the two techniques I shared to create your own home decor artifacts. Do share your feedback and experience on trying these out!


Monday 5 December 2016

Card - Eternal Love

I'm here to share a card I made over the weekend. I did not start off with any theme in my mind but it ended up as one trying to portray eternal love as I went along.


The effect I have tried to create is that of some lovely magnolias floating in a magical pool with lots of shimmery lights rising from the pool - celebrating the magical nature of long lasting love.

To create this card I started off by stamping three flowers from the 'Magnolias for Her' Stamp set from Altenew - one of my favorites from their collection. I stamped it on a Watercolor paper from Brustro and used a Mini MISTI stamping tool to get more accuracy. I added some color to these flowers using the Zig Clean Color Real Brush Pens. It was a lot of fun to see the way the colors blended to bring out some very pretty shading work. For the background to create the feel of flowers floating in the pool I used the Blue Zig Brush Pen around the flowers and also brought in some Light Green to try and create some leaves in the background (not being the focus).

For the sentiment, I combined a few stamps from different brands - One from Mudra and another from Inkadinkado. I inked them with Black Soot Archival ink from the Distress Mixed Media Ink Palette.

I was going to leave it at this when I thought I could try to create a Bokeh effect with some sequins to look as though the pool was emitting some lights. So I placed some sequins around the card. Though I could not capture the effect in the picture well, it does give that look when the sequins catch the light to give out the shimmery lights effect in actual.

After that I mounted the panel onto a pale yellow card stock and that onto an ivory card base.


In the pic above I have tried to take the picture at an angle where some of the sequins are shining when they catch the light.

Supplies

  • Alternew Magnolias for her stamp set
  • Zig Clean Color Real Brush Pens - set of 12
  • Brustro Watercolor paper
  • Mini MISTI stamping tool
  • Distress Mixed Media Ink Palette
  • Pale Yellow and Ivory card stock

I'm entering this card for the Altenew -  A Year in Review Inspiration Challenge - 


This is a challenge where we can select from any of the past inspiration challenges this year. The challenges and the lovely cards that were on display all through the year have been a wonderful inspiration to get into card making! 

The card I made is based on the JULY 2016 challenge.


Friday 2 December 2016

A Christmas Card

Since my little one is still sleeping, I thought I would sneak in another post for today. :D

Though Card Making is what I am into now, I have never finished making a complete card! I just keep either creating backgrounds or other elements never really tying them in together.

I finally made a full card yesterday inspired by the thought of taking part in a few Card Challenges! So I decided to make a Christmas Card. .
This is the card I made yesterday - again when my daughter was napping. :) I decided to go in for the Christmas Colors Red and Green for the Card and included Gold (based on Lulupu Challenge)


Supplies
  • Watercolor paper from Brustro
  • Distress Inks and Markers
  • Ranger's Mini Blending tool
  • Sakure Koi Waterbrush
  • Christmas Stamp set from Mudra Craft Stamps
  • Textured Cardstock
  • Versamark Watermark ink pad
  • Ranger's Gold Embossing Powder
  • Ranger's Heat Tool
  • Ranger's Liquid Pearls - Gold
  • Deco Art Gold Marker
  • Sakura Micron Pen - Red
  • Foam Tape and squares
  • Masking Tape 
  • Sequins
 For the Background, I used masking tape to tape offr areas where I did not want color. I then used the blending tool to blend in some Festive Berried Distress ink in the Center. I then went over it with the waterbrush to create a watercolored look. I then used the Mowed Lawn Distress Marker (only because I didnt have an ink pad of Mowed Lawn) and created the green stripes and used the watercolor brush to spread the color.

Once the background was ready, I stamped some snowflakes from Mudra Stamps with Versamark Watermark Ink pad and heat embossed them with some Ranger's Gold embossing powder. I did the same with the sentiment on a black cardstock that was cut into a banner shape.

Next I moved on to the Christmas Tree. I drew a tree by hand on some green textured Cardstock and cut it out with my scissors. I then embellished the tree with some Gold Marker and Liquid Pearls - Gold.


I then adhered the tree on the background with some adhesive foam sqaures and placed the sentiment at the base of the card. I then mounted the background on to some red textured cardstock (to match the tree) using foam tape. The whole thing was then mounted on a white card base. I added a few sequins to the card and then it was done!


Please do let me know what you think about this in the comments!! 


I am entering this card in the following challenges (My first time! :) )